Dslr camera controls
Dslr camera controls
Dslr camera controls
This is a basic stuff how to control your camera.
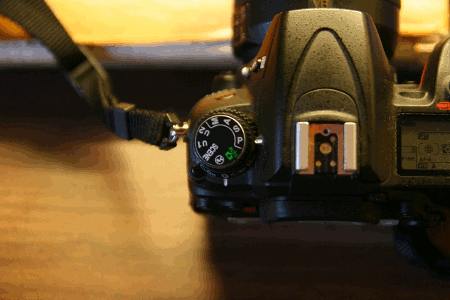
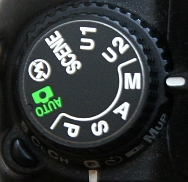
The release mode dial:
This dial is usually can be found on every camera at the left top side.
There is a construction where there is a button in the middle of it to prevent unintentional switching between the modes. Some cameras has double dials, there is a smaller bottom dial with usually a small button to avoid unintentional adjustment. What are the options here: Auto, P,S(Tv),A,M modes explained below scene modes explained little more below, U modes for some cameras(preset modes), No flash modes.
The main modes
Auto
Fully automatic mode: just point and shoot, sometimes opens the flash automatically if the camera has a flash. In other modes the camera usually doesn’t open the flash automatically.
-P – Program mode like automatic mode
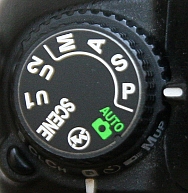
the camera calculates and set aperture and shutter speed as well, but we can control exposure compensation, white balance and many other things.
-A or Av Aperture priority mode
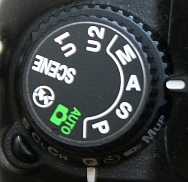
we set aperture, the camera calculates the shutter speed
-S or Tv Shutter speed priority mode
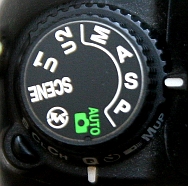
we set the shutter speed, the camera calculates the aperture.
-M Full manual mode
some setting only can be used in this mode – usually the camera suggests the settings, but we can control both settings, two dial makes it more easy, some settings of the camera only possible in this mode
Which modes to use?
I think the most useful is the aperture priority mode. Here I choose the aperture the camera calculates the shutter speed. If the shutter speed is too low I adjust the ISO higher or change the aperture to brighter. This way I can control depth of field as well. If I want blurred background use big apertures(f/1-f/4), if I want more area in focus smaller apertures (f/8-f/16)
Sometimes I use program mode if I don’t care so much about the result like walkaround in a city and make landscapes. It is also depend on your lens to use program mode, if your lens is not sharp at open apertures, or has some flaws you want to avoid (CA vignetting), some control perhaps needed.
Dials:
usually there are two dials or one dial. The dials can be found at the right side of the camera. One dial at front one at the back of the top of the camera. Entry level models usually only have one dial at the right top front of the camera. The dials can be used for any settings made.
The main function of the dial is usually to control the aperture. The aperture is the whole on the lens. Usually when we make pictures at first we saw through at open the widest aperture and the camera only makes the whole smaller when actually makes the image. We can check it by turning the lens for our direction and make a picture. I can group the aperture into three groups.
1. Wide apertures f/1-f/2.8 not all lenses has this bright aperture, here is the biggest is the light quantity
2. Middle apertures f/4-f/8 usually the sharpest most used apertures
3. Small apertures f/11-f/64 small whole deep depth of field preferred for macro and landscapes, the smaller ones are ruined by diffraction.
This dials sometimes used together with other buttons, for example with flash button(Nikon d7000 for setting flash compensation) or exposure comp button(Canon 350D to set exposure compensation), or autofocus button(Nikon d7000 to select autofocus points).
Exposure compensation:
We can set the picture to be brighter or darker.
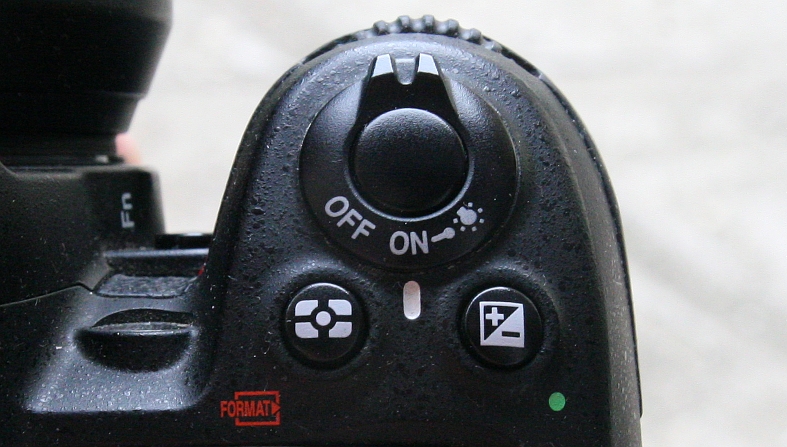
The right button with a +- sign is the exposure compensation button. Usually after pushing the button can adjust the exposure with one of the dials. + values makes the picture lighter – value makes the pictures darker.
The left button is for measuring light. There are usually three options:
1. Matrix or evaluative metering calculates the whole frame
2. Center weighted average more calculates the center region.
3. Spot only measuring small portion around the focus point
The button layout are different at different cameras.
Which metering to use ?
Most people including me always use matrix metering almost all the time and adjust the exposure compensation if I want different lightness darkness compare to camera setting. The camera always calculates the scenes as 20% grey it is a usual scene. Sometimes it is not appropriate, if the scene is too bright or too dark. For example snow usually very light 20% grey is not appropriate it makes the snow grey, which is not it is, in this case I apply + 2/3, +1 exposure compensation to make the picture lighter. Same with beach without trees. The beach is also very light not 20% grey. In forest the scene is much darker, I adjust -2/3 or -1 exposure compensation in order to look like it is. Don’t forget to set back the camera not to spoil the next picture if no exposure compensation needed for the next scene.
White balance or WB button
I usually leave the white balance on auto, or adjust by light sources like natural light, fluorescent light, covered etc. The point is that different light sources has different color temperature. On some cameras it is possible to adjust the white balance by Kelvin from 2500 to 10000 to be the most precise.
Some approximate values for Kelvin white balance:
Candlelight: 2000K
House lightbulbs: 3500K
Fluorescent light: 4000K
Outdoor daylight: 5500K
Overcast: 6500K
Shadow: 7500K
Dark shade: 9000K
Scene modes
There are preset scene modes on cameras like: portraits, show, high key, low key, landscape, firework, low light, sunset, sunrise, snow, pet etc. It can be useful in some situations, if we happy with the results.