Top 10 wildlife bird photography tips

Top 10 wildlife bird photography tips
Top 10 wildlife photography tips as I see it:
| [do_widget Text] |
Lets start with tip 1.
1. Top 10 wildlife bird photography tips
Get a good, high quality, long, bright lens.
2. Top 10 wildlife bird photography tips
Get a good, high quality, long bright lens.
3. Top 10 wildlife bird photography tips
Get a good, high quality, long bright lens. Perhaps wonder why is it so important. So in wildlife photography the lens is everything, unless you sit in a paid hide, 5-10m from the bird‘s nestbox in Springtime. You can have the best camera, a 36 Megapix Nikon d810, or a Canon 1Dx with a bad lens. Typically you cannot go close enough to the bird/animal, and you appreciate any lens sharpness you can get. With the not so good lenses, you need to get very close (usually very hard, or takes lots of time) in order to produce anything acceptable in terms of results. What are the best cheapest option? Canon 400m f/5.6L, or Nikon 300 f/4 Af-s, I would put the 1.4 Kenko on both of them. The new Tamron 150-600 is also very good.
If your budget not goes so far, The Canon 200mm f/2.8 is a fantastic lens as well, with the 1.4x and 2x teleconverter. With the 2X teleconverter though don’t expect miracles. I use it even with two converters stacked. Even cheaper the older Nikon 300 f4 is the next choice, with 1.4 converter and the Sigma 400mm f/5.6 APO telemacro. Below that level you can have the 70-300 consumer zooms. Sigma xx-500mm lenses I would only buy at good price used. The Canon 200mm f/2.8 with the 2X converter is similar like the Sigma 50-500, but with 1.4x converter far superior, without the converter worlds apart. And 1105g with two converters stacked, while the Sigma is 1800g. But if you like the Sigma’s picture quality, the Sigma is more versatile. Sometimes older Sigma 170-500mm is occur on a good price, is better than nothing or the typical 70-300mm zooms. The 500mm is a big difference compare to 300. The xx-500mm Sigma lenses are usually sharpest at f/8 or even f/10 range.
5. Top 10 wildlife bird photography tips
Find a very good place to photograph. I have places where I go only once a year, and know where well the vicinity, what can I photograph there. Birds usually keep their places, apart from migration period if you go back, you perhaps find the same bird there, or you make little investigation and find a better location nearby where you can even make better photos. Older more known places usually gives much better results. Many times I search for new places, find nothing there, when miss the good opportunities. Never know what can happen next even in a boring place.
| [do_widget Text] |
6. Top 10 wildlife bird photography tips
Study your subject and the place where you shoot very thoroughly. It is like landscape photography, 60% of this to make the photo.
7. Top 10 wildlife or bird photography tips
Study your equipment very thoroughly. Sometimes you need to react very quickly, partly this is why a good lens with fast autofocus is very important. On the other hand if I mess with camera settings, the bird or animal goes away.
8. Top 10 wildlife or bird photography tips
Take the time for shooting. Some time is needed, and more time is more useful, than lots of small times. If you have several days a year, this time can be quite effective, instead of spending several hours more frequently.
9. Top 10 wildlife or bird photography tips
Try to hide in the shadow in front of the good place, with the sun backwards.
10. Top 10 wildlife or bird photography tips
Visualize the photo you want to get. Try make a picture without the subject in certain times of the day, what you can do, how the picture will look like. Sometimes bad weather can work as well, for some type of photography not.
_______________________________________________________________________
Next Top 10 wildlife bird photography tips
There are two kinds of wildlife photography. The first is that you sitting in a hide, next to a nest, feeder or drink station, the other when you go out, walk and don’t know what you can capture. In the first type of photography you can pretty much organize everything, the perch you want the bird to photograph, the water level and reflections and many other things, you just wait for the birds or animals to come. This type of photography is more of a result oriented, here usually you can have better results in terms of output. The second type of wildife or bird photography is not so much about the results but having fun outside, and enjoy the time in the nature, while walking. The two types of photography needs different equipment. For walking definitely a longer and lighter lenses are preferred. In a hide sometime a 200mm lens is long enough, to make nice pictures. I prefer the second type photography, but sometimes make pictures from hides as well. For the walking type wildlife bird photography the following things needs to consider.
1. Shutter speed, aperture, ISO
It is very useful to know, which is the shutter speed you can handhold your lens with sharp results. If there is enough light around I prefer at least 1/1000s, with lenses longer than 500mm focal length even 1/1250-1/1600s for Aps-C or Dx cameras. If you have a longer lens which is not sharp wide open, you need to stop down your lens to have sharp results. Typically most zoom lenses must stop down to f/8 to have acceptable results. If the light level is low, I perhaps use slower shutter speed instead of using brighter not so sharp aperture. The other way is to use higher ISO speeds which is also not preferred. I usually use ISO 400, which is usually needed for a 400mm focal length. If the subject come closer smaller aperture is preferred, in order to have enough Depth Of Field (many times referred as DOF). In closer distances lower shutter speed is more safe than for longer distances. Most people think their lens is not sharp, because they use wide open aperture with a low ISO combination, which results unsharp images in most cases.
I would separate the photographic situations in two different parts:
1. Birds in the sky – flying birds or bat
2. Birds or wildlife at tree or ground (obviously deers, Bears or Lions rarely appear in the sky:))
What is the difference between these two situations?
The sky is much brighter, which allows us to use smaller sharper apertures or lower ISO speeds. If you have a very good prime lens not necessarily need to stop down the lens to get sharp results, you can use lower ISO values instead with better image quality. If you not sure experiment with different combinations. Usually bigger subjects are not so demanding, like small, tiny birds. At close distances relatively easy to make acceptable sharp images, but very hard with distant objects in dark situations.
2. Automatic setting or setting each shot individually
We have two options:
1. Set each shot individually
2. Try to use an automatic setting and make smaller adjustments

What settings we need to make? We set ISO, aperture, exposure compensation, white balance. Perhaps the first three is the most important. For example we make a shot of the small bird in the tree. We need high ISO setting, because the bird is small, and is not close a very rare shy specie, we want at least on usable shot. After we see a large bird in the sky, the first thing we want lower ISO for better image quality and narrower aperture for better sharpness, more depth of field. If our camera has an auto ISO function it can help in some degree. I mostly use Aperture priority setting. I set my aperture in the sharpest and adjust ISO as needed to have the desired shutter speed. A problem with it I need to check shutter speed first at pressing the shutter halfway, after can adjust ISO. A quicker solution is the shutter speed priority setting. Here the problem can be the following: We set 1/1000s and ISO 400. The bird on the tree is in the shade we need ISO 800 and 1/800s for example. After we see the big bird in the sky, we prefer higher shutter speed, perhaps smaller aperture and lower ISO. What we can do to use a higher shutter speed like 1/2000s. If there is not enough light the camera will use the highest speeds available in the dark situation. After we turn the lens towards the sky and we only need to turn down ISO a bit a camera do the rest. If we have auto ISO nothing needed to adjust. Why 1/2000s second? Becase if we set 1/800s and shoot the sky we end up with aperture of 1/16 or 1/22, which is not sharp. We want to keep the aperture below f/11 or f/10 to avoid impact of diffraction. I would avoid program mode completely because it is usually makes pictures at lower shutter speed, with smaller apertures which results in not so sharp images. I usually use the center point AF for two reasons, first the lens is here the sharpest, second it is the most reliable. Non cross-type focus points are useless according to my opinion.
3. Flash
I very rarely use flash in bird/wildlife photography. The flash usually makes silver eye on birds in dark situations. Many people use it, but with a long lens you need a flash extender (for example Better Beamer Flash extender), because most flash only works up to 105mm focal length. There are other setups when more flash is used to create the desired look / effect / brightness, but this is only works with organized photos at a pre-selected scene.
4. Tripod
If you want to walk to carry the Tripod it is a pain, especially if your lens+camera is also heavy. Tripod can work if you have a fixed place where you wait. Sturdy tripods are usually heavy, light tripods are usually not sturdy. If light tripods are sturdy you will pay much more. 🙂 In my experience in good light you gain little if any with the tripod. You can gain if you make a photo of a closer subject, or a non moving subject in dark situation. For quick settings the ball heads are better. With tripods you can use any shutter speeds if your subject is not moving. (Owls for example). I have not too much experience with monopods. In close distances it can help, but not as good solution as the tripod, where shutter speed is not limited. With tripods you have an option to left the camera somewhere and use a remote release, if you have a wide angle lens near the subject, or you prefocus the camera somewhere where you know the subject will appear. The one advantage of the monopods are
better portability, especially of telescopic ones.
5. How to get closer?
If you want better results, need to think about situations you know. It can be boring but a good bird feeder or drink station can give much better results, than occasional wondering. In hot summers some water in shallow drink stations can be a good idea. The shallow water needed for the birds to bath. Birds uses bath to get rid of moths, which eat their plumage. Winter bird feeder works best when the area covered with snow. Without snow it is hard to attract birds to the feeder. Birds of prey also appear sooner or later around the feeder. Many of the great pictures you see on the internet are directed like a film. Fish is supplied in a cage under the surface to photograph eagles, sometimes for kingfishers as well. Sometimes multiple flashes used to have the desired lighting. Many raptors are attracted with dead animal’s meat in Winter. To photograph them a good hide is essential.
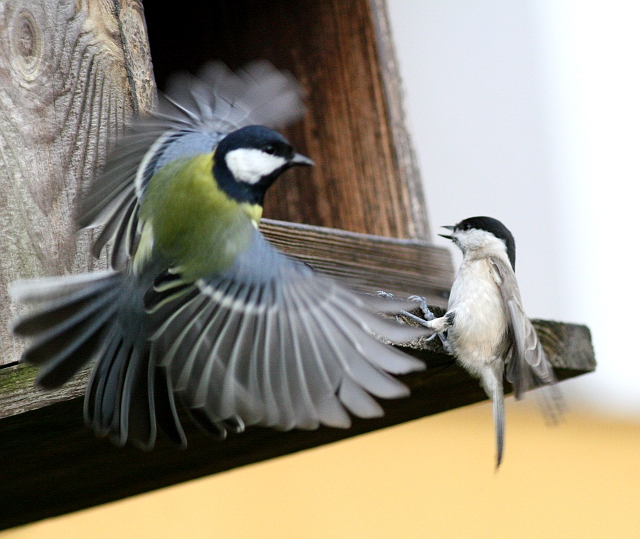
6. Know your subject very well
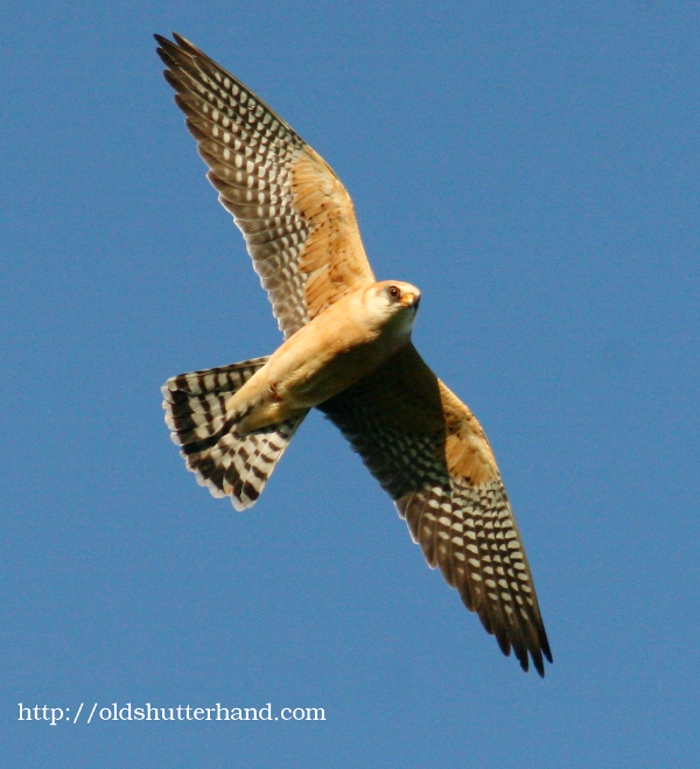
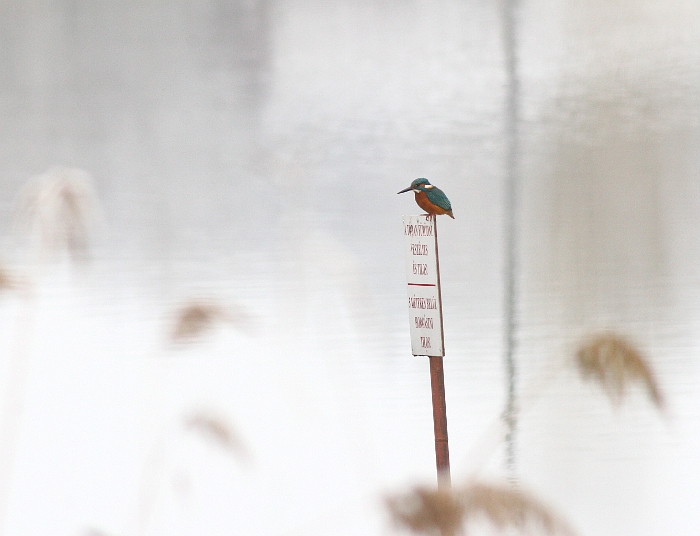
I spent many time of photographing different bird species. I know what I can expect from different birds, how they behave, when they will fly away, how close I can get, how to attract them. This helps a lot to make good photos. For birds the sounds are very important, I know almost all bird sounds I know. This way I recognize if a new bird appear as well. The same bird can have two three or more different sounds. (call, song, alarm call or other). Xeno canto.org is good place to search for sounds. I know the places where can I find Kingfisher, Bee eater, Buzzard, Western Marsh Harrier, White tailed eagle, Black woodpecker, Green woodpecker, Wren, Blue tit, Roller, etc.
7. Choose a time with good lighting conditions
Study the lights at the place where you want to photograph. Think about it. Don’t go facing the sun if you want front light. The usual best times are at dawn and dusk, when the lights are more soft, often referred as “Golden hours”. This is especially true for not abandoned places, where people appear usually scare away anything.
8. Use hides
There are some opportunities when you understand you need a hide or boat to make good photographs. A hiding tent or a mobile hide made from chipboard are not a big sum of money. The bee-eater picture at the top of the page were made from a chipboard hide. If you wants to make a mobile hide the following things to consider: there are many options, I just write how I done it. First, the hide is good to be not big enough to put in the car. It is depend on the car door size how big it can be. The hide I made has a 110cm width. The back of the hide is good to be covered, the other sides you can make openings. There are two types, with glass or without glass. The hide with glass is good when you can get really close. Half mirror like glass is used called Stopsol clear. This is a brownish glass, only one side good to look through. I prefer the hide without glass, here the best idea is to put round openings because these has the smallest area. I put 25cm diameter round openings. It is important that only you sitting in the hide or you want to be used with 2 persons as well. I am sitting in the hide for this the height needed to be as high, that you can comfortably sit in it. For the back I simply use dark blanket. It is very important to be dark inside. The sun must be behind, in order to be invisible, the best works in bright sunlight. Other possibility is a simple tent or military net, which is very easy to use and set up. The hide is more comfortable though. I usually put the hide in the place the day before when I come to photograph for the birds or animals to get used to it.
9. Get prepared for the shot.

When you arrive to the place how much time needed for you to make the photo?
Be sure you have the right lens on the camera, good ISO setting, good mode, good aperture, and shutter speed, etc. There is not much more frustrating than to travel, arrive to the good place there is a good opportunity, but you have a wrong lens on the camera, or wrong setting. The opportunity can happen from different direction, it is good to think about if the subject coming from different directions what is it possible to do to have the best results ?
10. Shoot
When you see something interesting, shoot. Don’t waste the good opportunity. If you can get closer you can shoot again. After you will throw out the pictures from longer distances.